Iowa State uses a cybersecurity tool called multifactor authentication (MFA) to protect your login information. With MFA, you are required to complete a second login step after inputting your Net-ID (username) and password - like typing in a code received via text message. You will be automatically prompted to enable MFA when first signing into your Iowa State accounts.

CHOOSE THE MFA METHOD RIGHT FOR YOU

Iowa State University requires two forms of multifactor authentication (MFA) to keep your account secure. MFA acts as an additional layer of security to prevent unauthorized users from accessing your account when your password has been compromised. Below are the MFA options available to Iowa State University users.  

Multifactor Authentication Methods and How to Enroll

Note: complete the steps above on your laptop or desktop to initiate the enrollment process.


Mircosoft Authenticator Mobile App


Available on Android and iOS, Microsoft Authenticator can send you push notifications to confirm account log ins or you can use the app to obtain a temporary 6-digit code to approve an account log in.

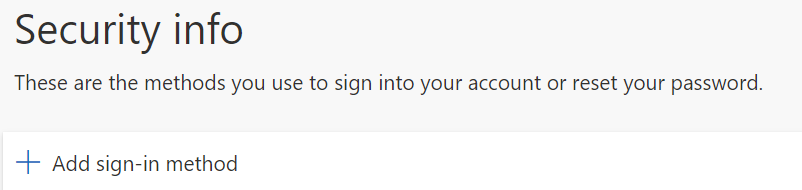
  1. Sign in to https://mysignins.microsoft.com/security-info with Iowa State email and password.
  2. Click Add sign-in method.
     

    The image shows a section of a webpage titled "Security info." Below the title, there is a description that reads, "These are the methods you use to sign into your account or reset your password." Underneath this description, there is an option labeled "+ Add sign-in method" which allows users to add additional methods for signing into their account or resetting their password.


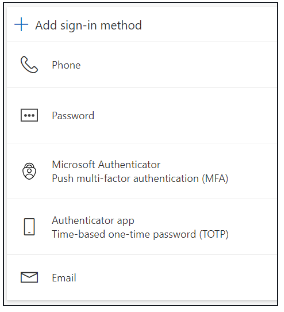
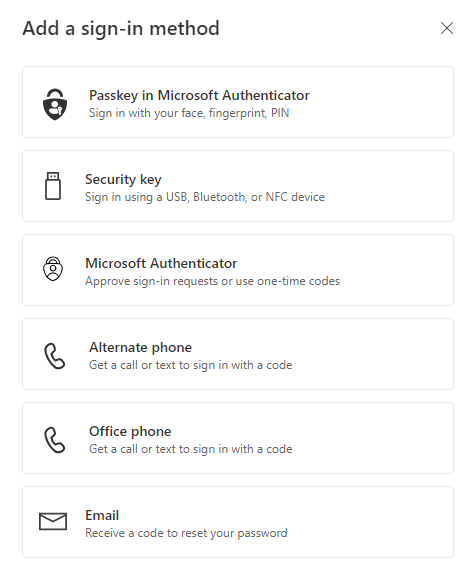
  3. Choose Microsoft Authenticator.
     

    The image shows a section of a user interface for adding a sign-in method. There are five options listed: "Passkey in Microsoft Authenticator" (sign in with face, fingerprint, or PIN), "Security key" (sign in using a USB, Bluetooth, or NFC device), "Microsoft Authenticator" (approve sign-in requests or use one-time codes), "Alternate phone" (get a call or text to sign in with a code), and "Office phone" (get a call to sign in with a code).
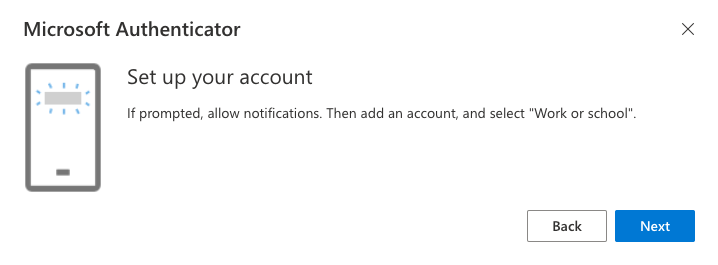
  4. Download the Microsoft Authenticator App on your phone.
     

    A screenshot of a Microsoft Authenticator setup prompt. The prompt instructs the user to start by getting the app. It says, "On your phone, install the Microsoft Authenticator app. Download now." Below that, it continues, "After you install the Microsoft Authenticator app on your device, choose 'Next'." There is also an option saying, "I want to use a different authenticator app." At the bottom right corner of the prompt are two buttons: "Cancel" and "Next"
  5. Choose Next.
     

    The image shows a setup screen for Microsoft Authenticator. The text on the screen reads: "Set up your account. If prompted, allow notifications. Then add an account, and select 'Work or school'." There are two buttons at the bottom: "Back" and "Next"
  6. Choose Next.
     
  7. Open the Microsoft Authenticator app on your phone and click the + button at the top.  
  8. Choose Work or School Account.
  9. Choose scan a QR code and scan the code that is displayed OR Login.
  10. Microsoft Authenticator will show in the list on your Security Info page.  


Google Authenticator Mobile App

Google Authenticator is available on Android and iOS and adds an additional layer of security by requiring you to know something (your password) and to have something (your phone or security key). The app generates temporary 6-digit codes that can be used to verify an account log in.

  1. Download the Google Authenticator app from your mobile device's app store.
  2. Go to https://mysignins.microsoft.com/security-info.
  3. Enter your ISU Email address if prompted
  4. Once on the Security info page, click 'Add sign-on method'.
     

    The image shows a section of a webpage titled "Security info." Below the title, there is a description that reads, "These are the methods you use to sign into your account or reset your password." Underneath this description, there is an option labeled "+ Add sign-in method" which allows users to add additional methods for signing into their account or resetting their password.
  5. On the pop up, select the 'Microsoft Authenticator' method.
     

    The image shows a section of a user interface for adding a sign-in method. There are five options listed: "Passkey in Microsoft Authenticator" (sign in with face, fingerprint, or PIN), "Security key" (sign in using a USB, Bluetooth, or NFC device), "Microsoft Authenticator" (approve sign-in requests or use one-time codes), "Alternate phone" (get a call or text to sign in with a code), and "Office phone" (get a call to sign in with a code).
  6. On the next screen, click 'I want to use a different authenticator app'.
     

    A screenshot of a Microsoft Authenticator setup prompt. The prompt instructs the user to start by getting the app. It says, "On your phone, install the Microsoft Authenticator app. Download now." Below that, it continues, "After you install the Microsoft Authenticator app on your device, choose 'Next'." There is also an option saying, "I want to use a different authenticator app." At the bottom right corner of the prompt are two buttons: "Cancel" and "Next"
    The image shows a setup screen for Microsoft Authenticator. The text on the screen reads: "Set up your account. If prompted, allow notifications. Then add an account, and select 'Work or school'." There are two buttons at the bottom: "Back" and "Next"
  7. Open Google Authenticator on your phone and click the 'Add a code' button. Then click 'Scan a QR code.
    (Note: If you already have an account using google authenticator, 'add a code' will not appear. Instead, click the plus button in the bottom right corner.)
     
  8. Back on your computer, click Next for the QR code to appear.
  9. Scan the QR code with your phone and click Next on your computer.
  10. Enter the code displayed in your authenticator app and click Next on your computer to complete the set up
  11. Google Authenticator will show up as "Authenticator app" in list of user MFA factors.
     

Phone Call


  1. Go to https://mysignins.microsoft.com/security-info.
  2. Enter your ISU Email address if prompted
  3. Once on the Security info page, click 'Add sign-on method'.
     

    The image shows a section of a webpage titled "Security info." Below the title, there is a description that reads, "These are the methods you use to sign into your account or reset your password." Underneath this description, there is an option labeled "+ Add sign-in method" which allows users to add additional methods for signing into their account or resetting their password.
  4. On the Add a method page, select Phone, and then select Add.
     

    The image shows a section of a user interface for adding a sign-in method. There are five options listed: "Passkey in Microsoft Authenticator" (sign in with face, fingerprint, or PIN), "Security key" (sign in using a USB, Bluetooth, or NFC device), "Microsoft Authenticator" (approve sign-in requests or use one-time codes), "Alternate phone" (get a call or text to sign in with a code), and "Office phone" (get a call to sign in with a code).
  5. On the Phone page, type the phone number for your mobile device, choose Call me, and then select Next.
  6. Answer the verification phone call, sent to the phone number you entered, and follow the instructions.

Security Key

  1. Go to https://mysignins.microsoft.com/security-info.
  2. Click +Add sign-in method.
     

    The image shows a section of a webpage titled "Security info." Below the title, there is a description that reads, "These are the methods you use to sign into your account or reset your password." Underneath this description, there is an option labeled "+ Add sign-in method" which allows users to add additional methods for signing into their account or resetting their password.
  3. Choose ‘Security Key’ in the pop-up menu.
     

    The image shows a screen titled "Add a sign-in method" with six options for signing in. The options are: "Passkey in Microsoft Authenticator" (sign in with your face, fingerprint, PIN), "Security key" (sign in using a USB, Bluetooth, or NFC device), "Microsoft Authenticator" (approve sign-in requests or use one-time codes), "Alternate phone" (get a call or text to sign in with a code), "Office phone" (get a call or text to sign in with a code), and "Email" (receive a code to reset your password)
  4. For security purposes, you will be asked to sign in with two-factor authentication. Choose ‘Next’. Confirm your MFA prompt. NOTE: If you don’t have any factors set-up, you will not get this prompt.
  5. Next you will choose the type of security key that you have. Choose the type of YubiKey you are configuring.
  6. You will see a prompt telling you to get your YubiKey ready. Be sure to have it out of packing and ready to plug into your device.
  7. Insert your YubiKey. You will be prompted to choose where to save your passkey for Microsoft. Choose ‘Use an external security key’.
  8. Confirm that you’d like to setup your YubiKey to sign in to login.microsoft.com as your Iowa State account.
  9. Confirm once more that you’d like to proceed with the set-up and share device information with Microsoft.
  10. If you have not previously set up a YubiKey PIN, it will prompt you, if you don't remember your PIN, the key will need to be reset, all existing credentials will be lost when doing this.
  11. Finally, you’ll be prompted to name your device. Be sure to keep it simple and easy to remember.